April 2011, Issue 15
Tools
Page 37
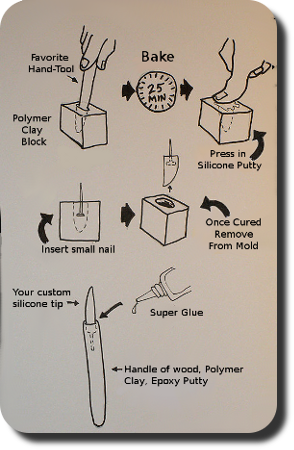
 Take a favorite wooden or metal tool (thickness is a bit of a factor here as too thin or skinny will not work, also give yourself a little bit of length by pushing into the clay deep enough to be able to mount it) now press it into a block of polymer clay such as Super Sculpey, remove and bake. Once the clay is hardened and cooled you have a mold for the silicone putty. Mix up enough putty to fill the void of the mold you just made, then press it down into your mold, make a snake of the putty if need be to get all the way down into the mold.
Now take one of those tiny picture hanging nails and embed the head into the silicone - this will be your anchor for the handle since glue does not work on silicone. Once cured you pull your silicone head out of the mold with the permanently attached nail anchor and you have just made your own custom silicone sculpting tool head! Your handle can be made from polymer clay, wood, epoxy putty - whatever you are comfortable working with, using glue on the exposed nail to hold the head in place in its handle (see drawing photo).
From molds to texture stamps to custom rubberized sculpting heads, these are just a few of the uses I have for silicone putty. What uses can you think up for an interesting new spring project?
Custom Dolls, Houses & Miniatures / CDHM


