


Learn To Make
Fantasy Film Fairy Wings
by Deb Wood
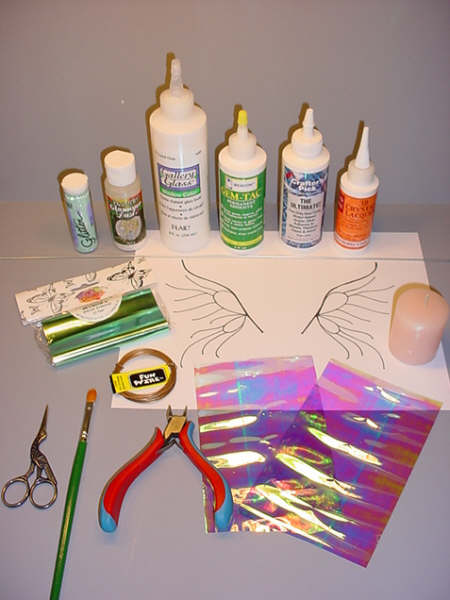
Materials Needed:
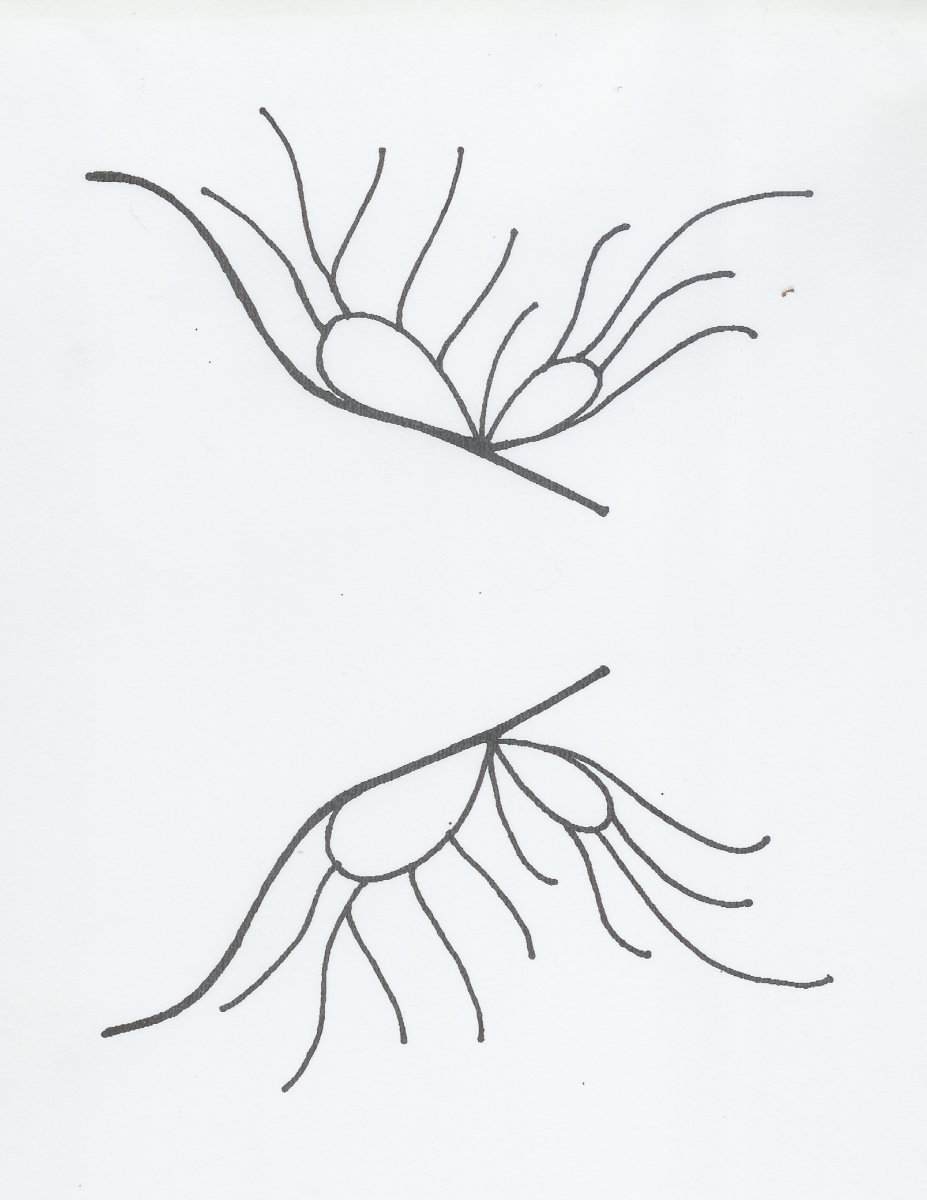
- Pattern (shown below)
-
Colored Wire - 24 ga. (0.5-0.6mm) (or plain wire)
I use Fun Wire, it is plastic coated and works so well for this
- as the glue really grabs onto it - 1 Piece Of Heavy Stem Wire, Preferably Plain, 16 Gauge (1.29mm) Or 18 Gauge (1.02mm)
- Fantasy Film
- 3D Lacquer In Clear Or Clear Gallery Glass
- Gem Tac Glue Or Ultimate Glue By Crafter's Pick Or A Similar Type White Glue
- Art Glitter or Prisma Glitter (Optional)
- Delta Ceramcoat Varnish in Matte or Satin (Optional)
- Votive Candle
-
Tools:
Wire Cutters
Medium Paint Brush
Tape
Scissors
Tweezers
 Close-up images of materials needed.
Enlarge Picture of supplies need.
 1. Enlarge pattern image (its going to appear large, you'll need to scroll to close the image). Copy to your computer, right click, save image; then print out in any size you need.
Enlarge Picture to enlarge pattern.
TIP
The wings pattern are intended for a fairy about 6" tall, you can rescale the pattern to any size. Just make sure you use finer wires then too.
The wings pattern are intended for a fairy about 6" tall, you can rescale the pattern to any size. Just make sure you use finer wires then too.
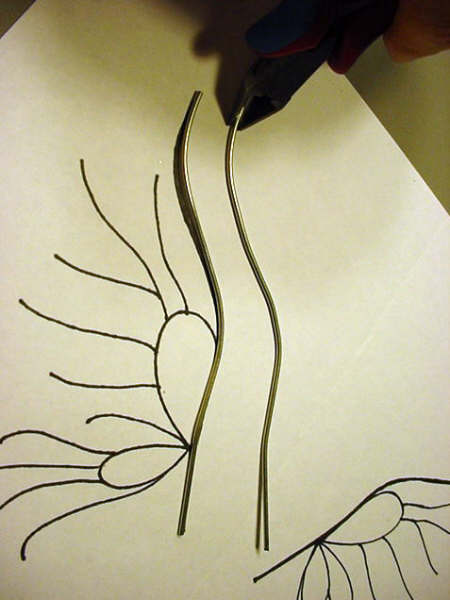
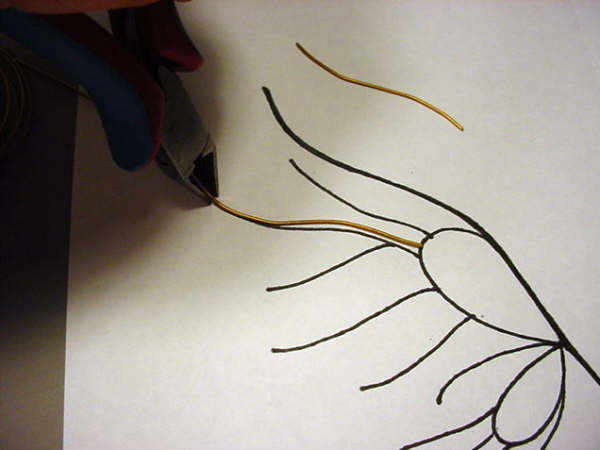
 2. Begin by cutting the heavy wire, bend it to follow the pattern's main stem. This is the part of the wing that will go into the fairy's back. It gives good support and superior strength.
Enlarge Picture of wire to pattern.
 3. Continue cutting the other or veining wires, bending them to follow the curved lines in the pattern.
Enlarge Picture showing pattern and bent wires.
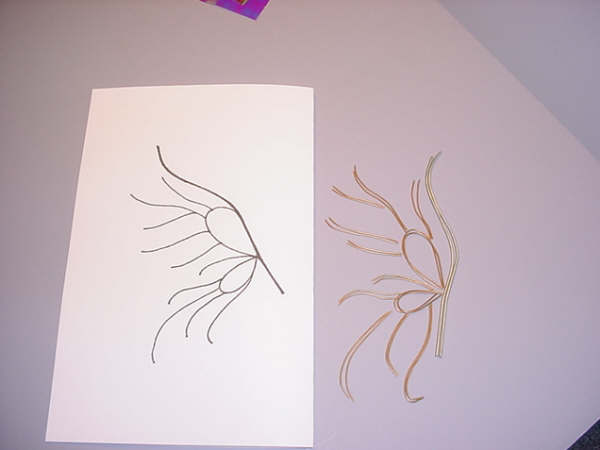
 4. It's important to make sure the wires lay flat. I cut the wires for both wings at one time and lay them out in order.
Enlarge Picture showing flattened wires.
TIP
This wire comes in many colors. It is really important to select the right color wire for the wings you are making. Since the film is clear, with only an overlay of color, the wires are actually the main color you will see in your wings. So, to choose black wire makes the veining stand out-to use silver would make the veining recede.
I also like to use a bright color, say pink, if the fairy's garments are also bright.
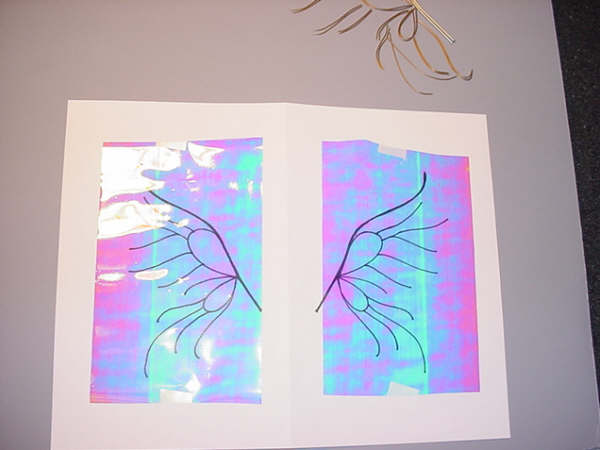
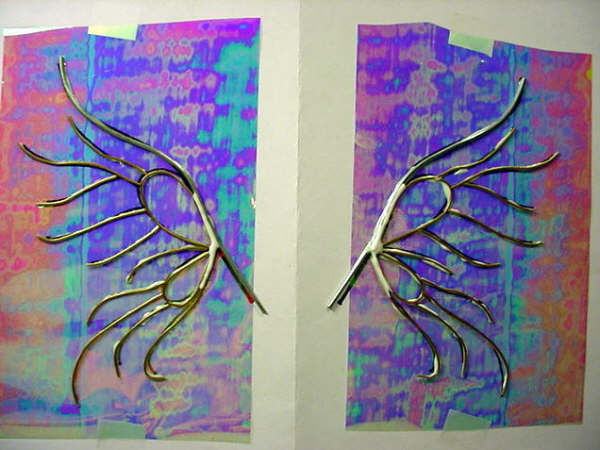
 5. Cut two pieces of the Fantasy Film and tape them down on top of your pattern. (I used Spring Morning Fantasy Film, although you wouldn't know it by the colors my camera picked up).
Enlarge Picture showing fantasy film preparation.
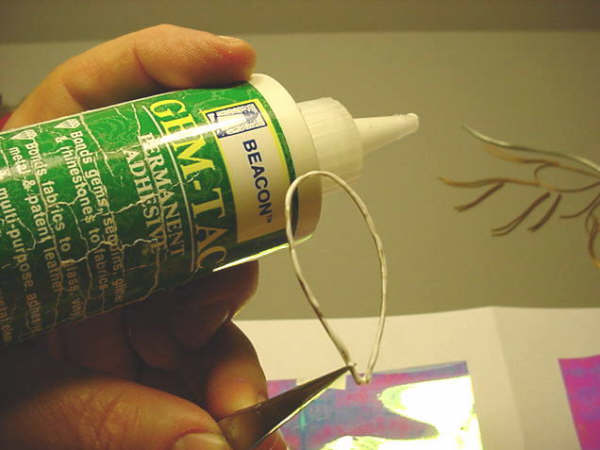
 6. Holding the wires with a tweezers, apply glue to the underside of each wire.
Enlarge Picture show how to apply glue.
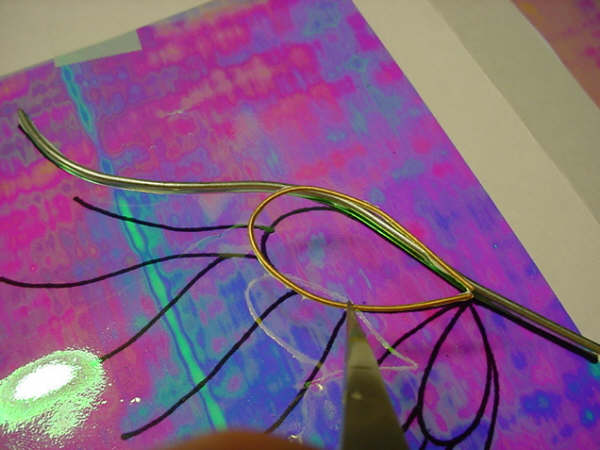
 7. Carefully place the wire with the glue onto the film, following the pattern. This can be a bit touchy, you don't want to get excess glue on the film if you can help it. Try to butt the cut ends up against one another. This will give the wings a finished look.
Enlarge Picture showing how to place wire onto film.
TIP
I only apply glue to the side of the wire that will be in contact with the film. My wings are only one layer of film. I know some people do double layers, with wire in between. Never had much luck with that...too many air pockets.
I only apply glue to the side of the wire that will be in contact with the film. My wings are only one layer of film. I know some people do double layers, with wire in between. Never had much luck with that...too many air pockets.
 8. As the glue is setting up, press down on the wires to make sure they have adhered evenly.
Enlarge Picture showing to show even glue method.
 9. One side is done! Now repeat Steps 2-8, for the other wing.
Enlarge Picture on repeating Steps 2-8.
 10. Add an extra bead of glue where all the wires come together with the main stem of the frame. This will help strengthen and reinforce this area.
Enlarge Picture on how to strengthen and reinforce wings.
 11. Allow the glue to dry thoroughly. This will take a couple hours at least.
Enlarge Picture about dry stage.
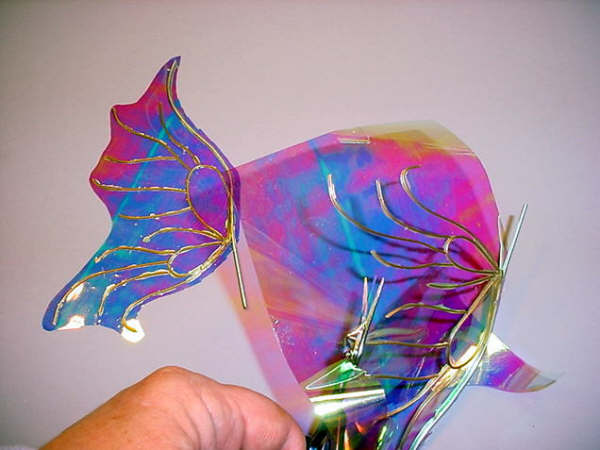
 12. Once the glue is completely dry, cut around the pattern, leaving about 1/4" extra film around the edges.
Enlarge Picture showing cutting away excess film.
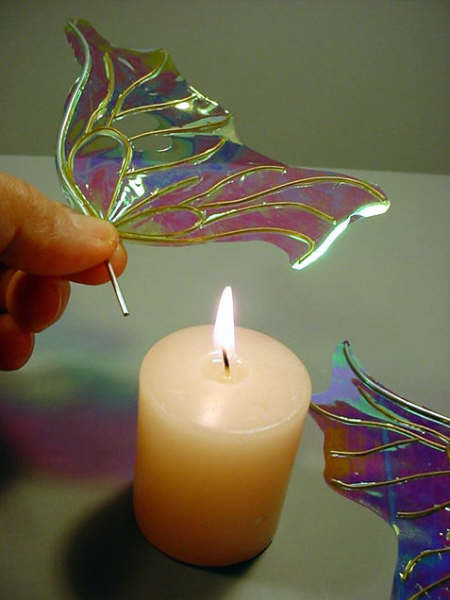
 13. Now here comes the fun part! Now for the shrinking of the film and that all important votive candle!!!!!
Fantasy Film will shrink and strengthen with heat. The more heat it is exposed to the more the color comes alive. You must be careful because too much heat will melt it away, or remove the color, leaving a haze of white.
Enlarge Picture showing the votive candle.
TIP
Shut the windows so you don't have any breeze on the candle flame. You want to control this process as much as possible. Also trim the wick on the candle so it's not too large a flame.
Shut the windows so you don't have any breeze on the candle flame. You want to control this process as much as possible. Also trim the wick on the candle so it's not too large a flame.
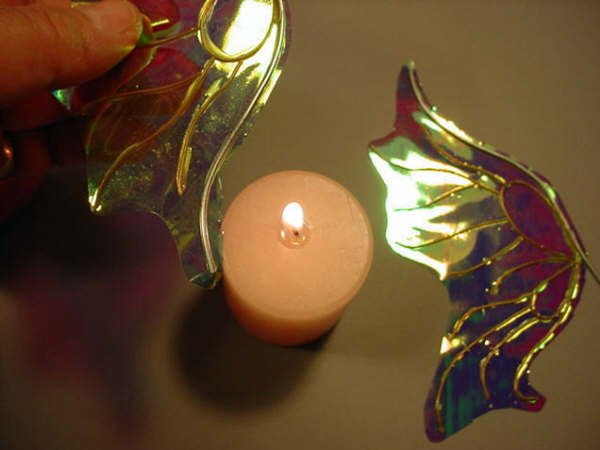
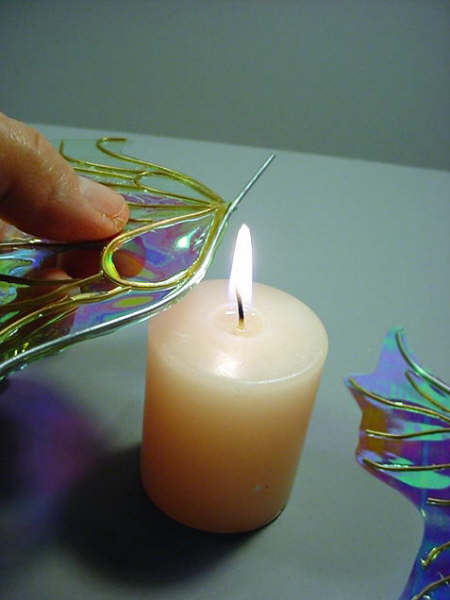
 14. Hold your hand over the flame to see how high your hand has to be before you feel the heat. Judging by that distance, hold your wing over the flame, about 6 or more inches above it. Holding the wing flat, move the wing around quickly, and watch the film tighten against the wires!
Enlarge Picture showing how to start shrinking.
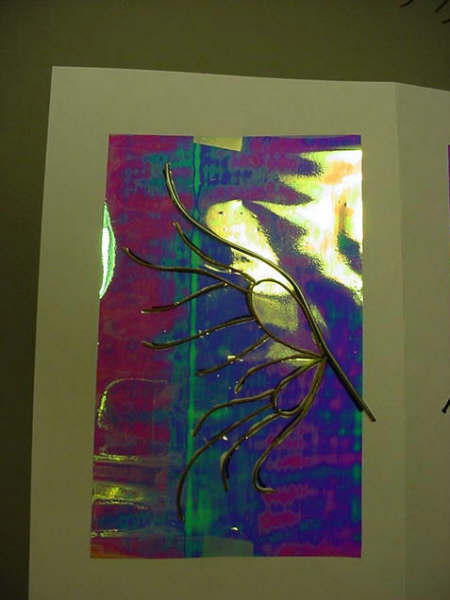
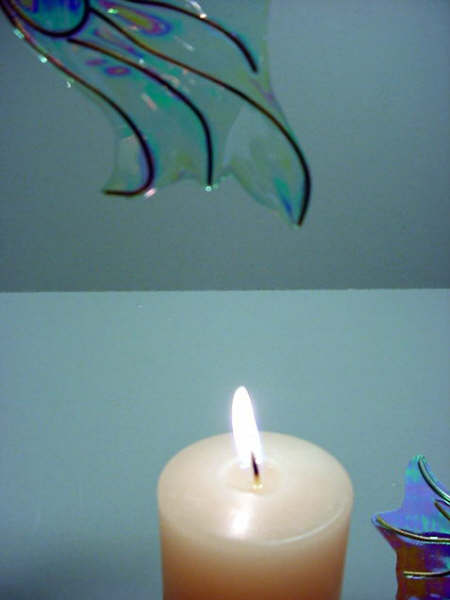
 15. Raise and lower the wing to see the colors explode! You will also be able to see where a hole is going to form, first the color becomes very intense, then the hole forms. As I was holding this wing with one hand and trying to take a photo with the other, two large holes appeared, just that quick! Oh well, I'll have to try to match them on the other wing! We must be creative!
Enlarge Picture on how to create holes.
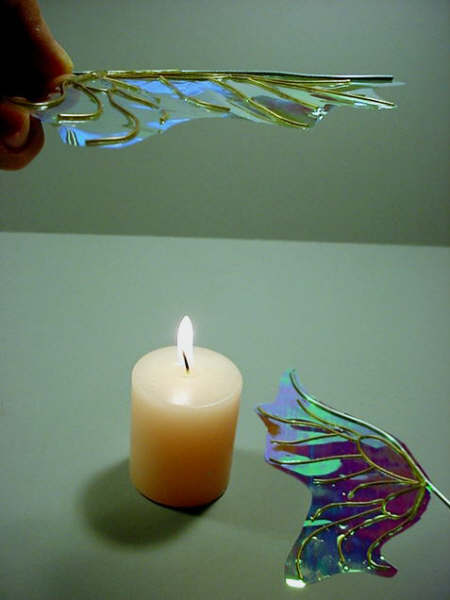
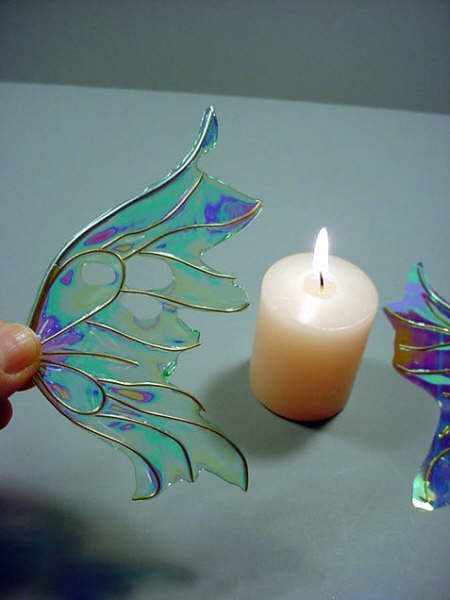
 16. To sear the edges along the wires, you can go very close to the flame, drawing the edge of the wing along the flame. Be careful not to scorch the wires, however. Go over it twice, rather than too much the first time. To shape the outer jagged edge of the wings, hold them upright and perpendicular to the flame.
Enlarge Picture on how to sear the edges.
 17. Raise the wings up and down to form the jagged edges.
Enlarge Picture on searing the tips.
 18. Again, go over it twice rather than melt too much the first time.
Enlarge Picture to repeat process, if needed.
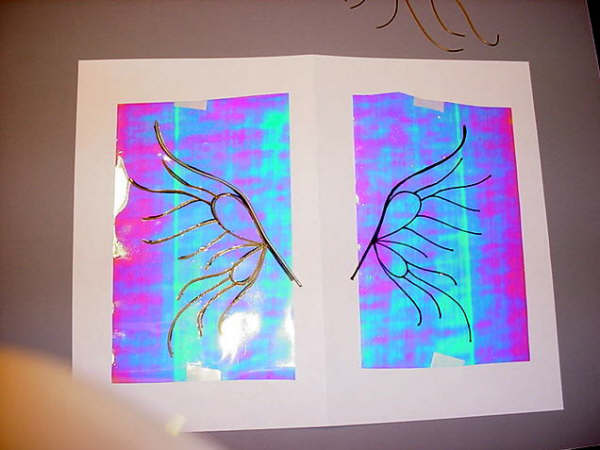
 19. Lay the wings out and check for symmetry. They don't have to be exact, but close is good! See the holes? I tried to match them as much as I dared! If you melt away too much it does affect the look of the wings. I try not to do that. You might have to start over, so go slowly and be careful.
Enlarge Picture on how to determine symmetry.
 20. Another view to determine wings symmetry.
Enlarge Picture showing another view.
 21. I did a little more melting of the edges to make them more uniform.
Enlarge Picture showing final searing.
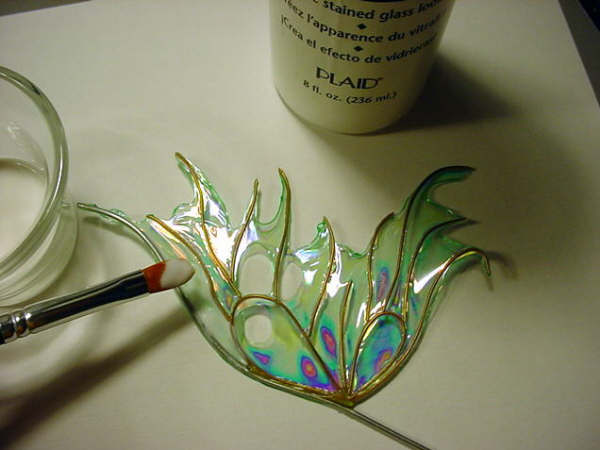
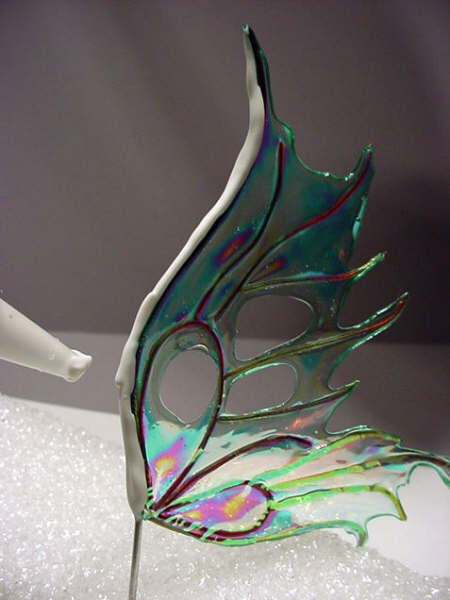
 22. Now to seal the wings. This step serves two purposes. Most importantly, it bonds the wires to the film and it adds strength to the overall structure of the wings. In this step I used clear Gallery Glass, but you can also use 3D Lacquer. You want to be sure to use a product that will stick to the film. Some varnishes won't. Do a test if you are using something other than what is suggested here.
Enlarge Picture showing how to seal the wings.
TIP
Clean your brush immediately in soapy water. Rinse well.
Clean your brush immediately in soapy water. Rinse well.
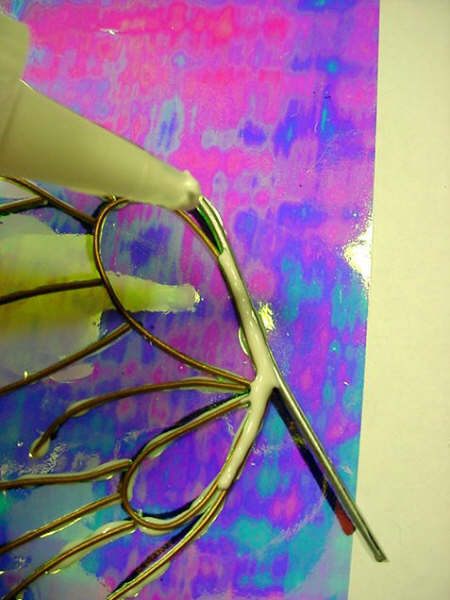
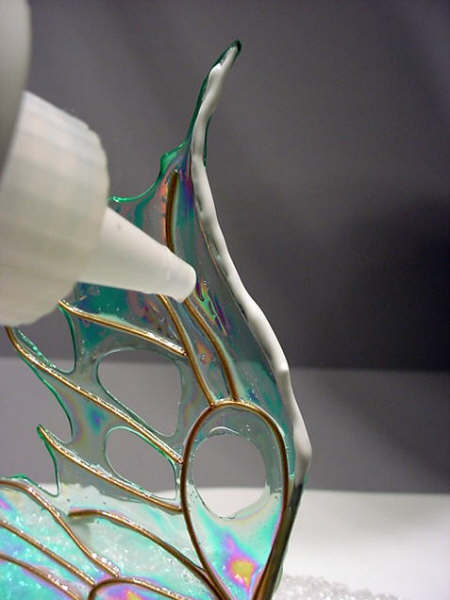
 23. Brush the product on the wired side of the wings. Be sure to have a good deal of the product along the wires. Let it pool there. This will hold the wires securely. Keep in mind that 3D Lacquer dries much more quickly than the Gallery Glass.
Enlarge Picture showing how where to pool the sealant.
TIP
Before proceeding to the next step please read. If you are using 3D Lacquer, do not put it under a heat light! It will bubble and cause the lacquer to become cloudy. (I learned this the hard way).
Before proceeding to the next step please read. If you are using 3D Lacquer, do not put it under a heat light! It will bubble and cause the lacquer to become cloudy. (I learned this the hard way).
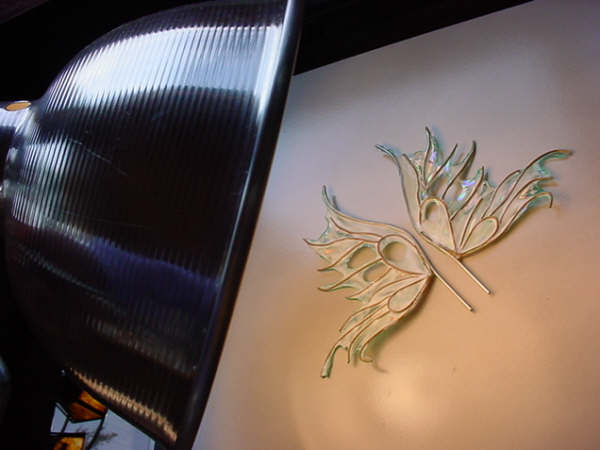
 24. To speed up the drying time of the Gallery Glass, I placed the wings on a ceramic tile and then suspended a reflector light and 100W bulb over them, (see note below). There is about 8" of space above the wings. They dried in about three hours. The ceramic tile helps to distribute and hold the heat. Drying without the light can take 12 hours or more.
Enlarge Picture showing how to dry the wings.
TIP
On these wings I didn't add an overall glitter, but you can do that now. Simply sprinkle glitter into the wet sealer. You'll want to be careful though, as the glitter is hard to control. A light application looks best. I prefer to add the glitter after the wings are thoroughly dry and I apply it using the Ceramcoat Matte or Satin varnish.
On these wings I didn't add an overall glitter, but you can do that now. Simply sprinkle glitter into the wet sealer. You'll want to be careful though, as the glitter is hard to control. A light application looks best. I prefer to add the glitter after the wings are thoroughly dry and I apply it using the Ceramcoat Matte or Satin varnish.
 25. Apply a heavy bead of glue along the main wire.
Enlarge Picture to prepare to glitter.
 26. Place glue on both sides to cover completely.
Enlarge Picture where to place glue.
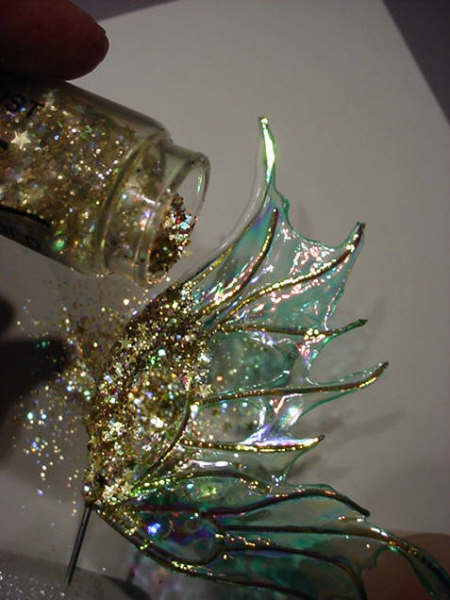
 27. Quickly sprinkle glitter or microbeads on the glue. You can add glitter to some or all of the other wires if you wish.
Enlarge Picture where to place glue.
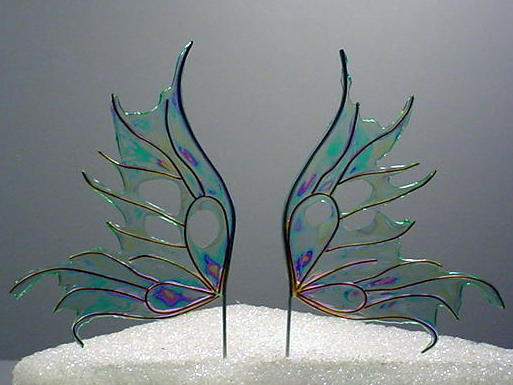
 28. Tap off excess, and place upright to dry. I stick the wires into a piece of styrofoam and set aside.
Enlarge Picture showing where to tap off excess.
TIP
You can also add marabou feathers at the base where the wings will go into the fairy's back or embellish as you wish! Do this after you apply the glitter. Such fun!!!
You can see there is still some Gallery Glass that has not dried completely. It was set up enough for me to handle the wings, and they will be allowed to dry overnight now so that will all be dried clear in a few more hours.
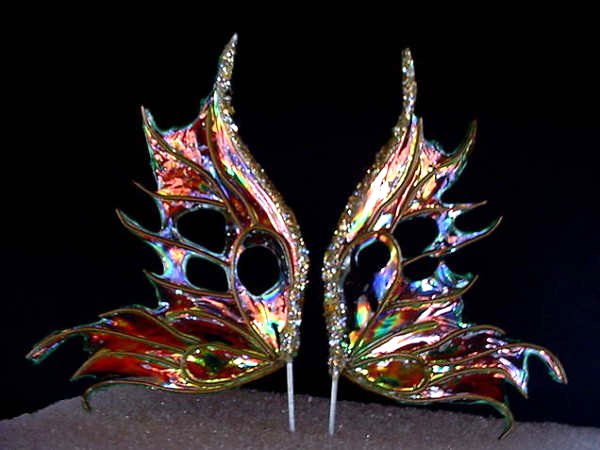
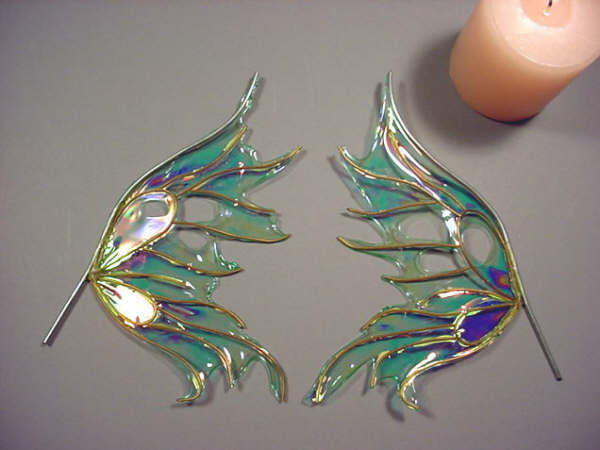
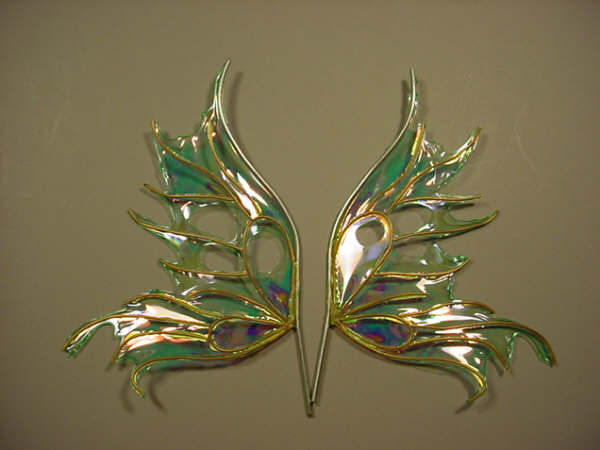
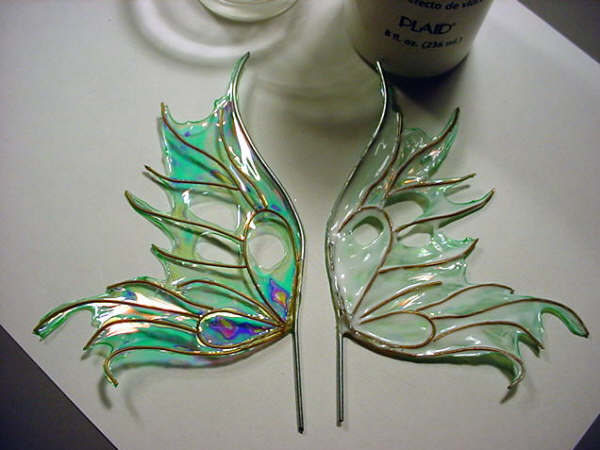
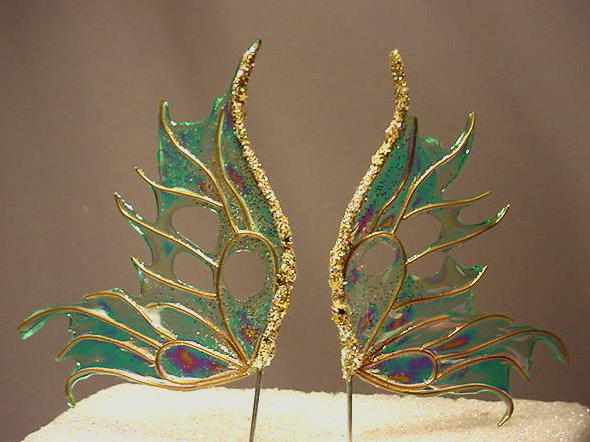
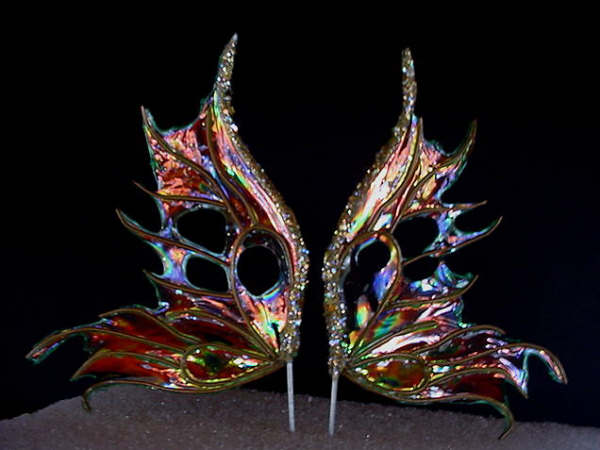
 29. Finished wings, dry and ready for use.
Enlarge Picture showing finished wings.
TIP
This photo above was taken when the wings were completely dry, in natural daytime lighting. See the color explode? Now you can see why we love that Fantasy Film!! The deeper colors are achieved with more intense heat as described above.
This photo above was taken when the wings were completely dry, in natural daytime lighting. See the color explode? Now you can see why we love that Fantasy Film!! The deeper colors are achieved with more intense heat as described above.
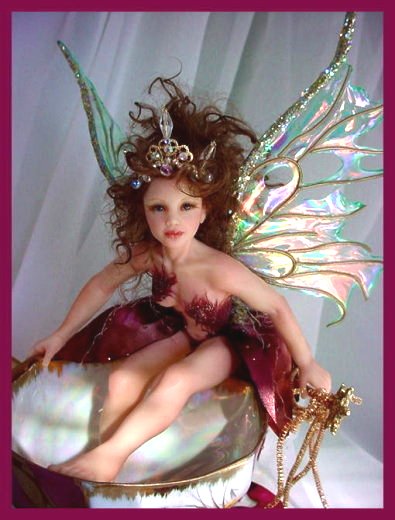
 31. Completed wings on my fairy sculpt!
Enlarge Picture showing completed wings on fairy.
FINAL TIP
If you use Gallery Glass to seal your wings, be careful how you pack your fairy for shipping. Customers have told me that they have received fairies from other artists with all kinds of poly batting fuzz stuck to the wings. I usually don't permanently attach the wings to my sculptures, so I am able to wrap the wings separately in tissue before packing. However, I think that parchment paper, then tissue might help this issue, particularly in the summer heat. Something to keep in mind.
If you use Gallery Glass to seal your wings, be careful how you pack your fairy for shipping. Customers have told me that they have received fairies from other artists with all kinds of poly batting fuzz stuck to the wings. I usually don't permanently attach the wings to my sculptures, so I am able to wrap the wings separately in tissue before packing. However, I think that parchment paper, then tissue might help this issue, particularly in the summer heat. Something to keep in mind.
MEET THE ARTIST
 Deb Wood for as long ago as she can remember has had art as her passion. In 1994 then again in 2002, her work was licensed into reproduction with the introduction of her gift lines. For the past 15 years she has taught seminars in polymer clay sculpting to young and young at heart. Her work has been featured on television, newspaper articles, magazines and ads for polymer products. She has also written several instructional articles as useful teaching aids for companies and publications.
Born and raised in the Midwest, Deb & her husband continue to live in "God's Country". Deb says that it's beautiful and so very peaceful there among the towering pines. Kids are grown and now her loving husband and Deb get to enjoy the wonderful antics of the grandkids. Deb says "life is good" and that she is blessed.
Deb says, "in my youth I took it for granted; but now I do not, I know I have been graced with a gift -- and it is my pleasure to share it with you. I hope one of my 'little people' will bring a smile to your face--and if it does, my job is done, and I thank you."
Deb is a valued member of the CDHM Forums. Visit the Galleries today.
Deb Wood for as long ago as she can remember has had art as her passion. In 1994 then again in 2002, her work was licensed into reproduction with the introduction of her gift lines. For the past 15 years she has taught seminars in polymer clay sculpting to young and young at heart. Her work has been featured on television, newspaper articles, magazines and ads for polymer products. She has also written several instructional articles as useful teaching aids for companies and publications.
Born and raised in the Midwest, Deb & her husband continue to live in "God's Country". Deb says that it's beautiful and so very peaceful there among the towering pines. Kids are grown and now her loving husband and Deb get to enjoy the wonderful antics of the grandkids. Deb says "life is good" and that she is blessed.
Deb says, "in my youth I took it for granted; but now I do not, I know I have been graced with a gift -- and it is my pleasure to share it with you. I hope one of my 'little people' will bring a smile to your face--and if it does, my job is done, and I thank you."
Deb is a valued member of the CDHM Forums. Visit the Galleries today.
© 2007-2013 Deb Wood and CDHM.org
Reproduced with permission from from Deb Wood. All photographs and text appearing in this tutorial are the exclusive property of Deb Wood. Permission is explicitly denied for any republication of text or photographs in this article without the prior express written consent of the author.